2017-03-24
[public] 22.9M views, 302K likes, dislikes audio only
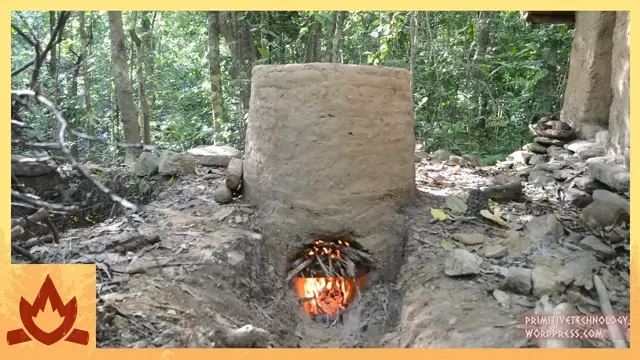
I built this pottery kiln and some pottery from termite mound clay to test an alternative clay source to my usual one from the creek bank. I started by making a large grate from ordinary clay. It was just under 50 cm in diameter. Next, I took dry chunks of termite nest and put them into the pit in front of the tiled roof hut. The chunks were crushed and water was added to slake the clay. The clay was trodden on to mix it. Dead palm fronds were added to the clay to stop it from cracking as it dried and to add insulation to the kiln. The mixture was trodden on again and then taken from the pit. A trench was dug to form the firebox of the kiln and a wall of clay was made in the front of the trench. A hole was dug into the wall to allow air flow into the firebox.
The grate was placed on top of the firebox and the walls of the ware chamber were built around the grate. When the kiln walls were finished, grate bars made from termite clay were placed into the firebox. Grate bars are important for fireboxes as they lift the firewood off the ground allowing air to move up through the fuel bed for more efficient combustion. Burning wood as a heap on the ground allows cold air to flow up and over the coals, cooling the kiln and leaving the air unreacted with the fire wood. It still works but is much less efficient than using grate bars. The finished kiln was 50 cm tall (above grate height), 50 cm in diameter and with walls about 12.5 cm thick. The pit/firebox was about 25 cm deep and 25 cm wide with grate bars sitting half way between the ground and the circular kiln grate above.
Next, for the pottery clay, I selected a termite mound built on red clay soil. I took it to the kiln area and slaked it with water and mixed it in a small pit. I crushed up an old grate from a previous kiln and mixed it into the termite clay as grog. Grog prevents pottery from cracking as it dries and helps prevent breakage when firing. I then shaped the clay into a small urn. I also made some barrel roof tiles and a smaller pot from termite clay. I then stacked the kiln with the termite pottery.
To fire the pottery, I collected a large pile of dead wood and started a fire in the firebox. I heard some explosions in the kiln early on and knew something broke but continued anyway. Within an hour the kiln had heated up well and the pottery was glowing red hot. By the second hour the temperature went down illustrating an important point: if you over fill the firebox with wood the kiln will choke it and not burn efficiently. Realising this mistake I merely let the wood burn down a little so more air could get through. By 2 hours and 30 minutes the kiln was firing nicely again with all the pottery glowing low orange (about 845 c or 1550 f). I kept it at this low firing temperature for another 30 minutes. The whole firing process took about 3 hours from start to finish, a relatively short period of time for firing pottery.
When I took the pottery out, one tile had broken and the urn had spalled (a piece of the outer pot broke off) possibly due to still having moisture in it. The urn was still useable though and I use it to water the cassava patch. The forge blower was well fired and is now immune to water damage, no longer needing to be carefully protected from the rain. I put it in the barrel tile shed for storage. I put the broken tile and spalled piece from the urn in a special heap of broken pottery. When I make pottery in future I can crush up these broken pots and mix it into the new clay as grog to strengthen the new ceramic items. Finally, I stored the good tiles at the barrel tiled hut as replacements for broken tiles in that structure should there be any damage in future.
Termite clay is good material for making furnaces and an OK substitute for good pottery clay should it be difficult to find a better source. The termites have already processed the clay by the fact that their mouths are too small to include sticks and pebbles into their structures. As a result, the clay is very smooth and plastic. Too smooth for my liking, in fact, I’m used to working with coarser clay that has silt mixed into it naturally. I find that termite clay is either too runny when wet or cracks too easily when drier. It was difficult to form into complex shapes and it took me 2 attempts to make the urn. But for forming objects like tiles it’s OK, it can be pressed into shape and it will hold without difficulty. In future, I’d be likely to use termite clay for mass producing formed objects such as bricks, tiles, simple pots (formed over a mould) and possibly pipes, thereby conserving the dwindling clay supply from the creek bank which I’ll save for more intricate pottery. In summary, termite clay is able to be used to produce basic pottery if no other source can be found. If you have a termite nest you can make basic pottery from it.
http://www.penguinrandomhouse.com/primitive-technology
/youtube/video/aZ4KNMnTsIs?t=262
/youtube/video/_ZXUCQc2Z78
/youtube/channel/UCAL3JXZSzSm8AlZyD3nQdBA
/youtube/video/nG-rNHgFxhs
/youtube/video/RZGAYzItazw
http://www.penguinrandomhouse.com/primitive-technology

